Want an easy DIY shiplap wall project to do this weekend? It is no secret about my house that feature walls of any kind are my Popular DIY projects. In particular, a good shiplap feature wall is near the top of the list.
I am sure you are Strange with shiplap; it has been all the rage accurate Joanna Gaines first stepped onto HGTV, and they've only get more popular as farmhouse-style homes gained a following.
I'm here to tell you, but, that shiplap isn't reserved for farmhouse styles alone. It can very simply put a modern spin on a space, and I myself been to love a modern shiplap look. Whether you are moving for modern or rustic, shiplap is here to stay, and it is an easy way to elevate a space.
There are a few different kinds of shiplap, but for the beginner looking to find a totally doable wall paneling DIY, I recommend Nickel Gap tongue-and-groove shiplap. These types of boards provide you with a classic shiplap look and simply snap together in order to even spacing (nickel gap spacing, to be exact).
How to create a DIY Shiplap wall
You will need:
If you are in the market for this DIY project, I recommend the following supplies in order to make your procedure seamless:
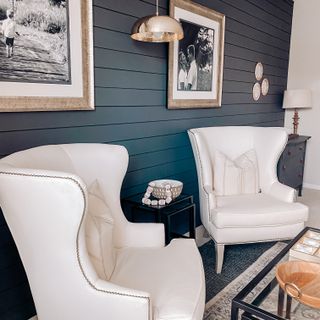
(Image credit: Liz Hartmann)
Here's how I acquire the shiplap walls in my own home, with tongue-and-groove shiplap.
1. Mark your studs
The first thing you will want to do for this project is mark your studs. I recommend using the stud finder to decipher where your wall studs are and tying straight lines with your level all the way up the wall.
These will be covered up by the shiplap boards, and it is way easier to find studs above your walls than it is to find studs above your walls and your shiplap boards. So best not skip this step...
2. Create a level base to work from
Once you have your studs marked, it's time to start hanging your boards. You will need to decide if you want to originate at the top of the bottom of the wall. I don't think that there is a smart or wrong choice here, but I usually start at the bottom, simply because it is easier to ensure that a embarking is level while your feet are firmly planted on solid ground.
There really isn't much left to do except to originate nailing those boards into your studs, but I cannot pain enough how important it is to make sure that your grand row is level.
If you are familiar with DIY, you know that most walls are not stretch or level, and assuming so, you will land with a crooked shiplap wall if you do not detached off your first row of shiplap. This means, even if you have a baseboard that visually looks like it's detached, it's still important to level your first board. If there is a gap between your shiplap and the consume or baseboard, you can always fill it in later with spackle or painter's caulk.
Once you're sure your grand shiplap board is level, use a brad nailer to nail into studs consume the lip of the board to secure. Nailing consume the lip will save you time from having to fill all your nail holes later because the nails will be hidden. You will want to continue hanging boards flush anti one another until an entire first row is complete.
3. Paint the lip between boards
After the first row is hung, there is a step that you don't want to miss. If I am painting the shiplap (which I always do), I paint the exposed lip of embarking in between rows.
This step isn't completely necessary, but it is a lot easier to paint the gap when it is exposed than it is to go in with a petite paintbrush at the end. Just a little time saver that I like to incorporate into the project.
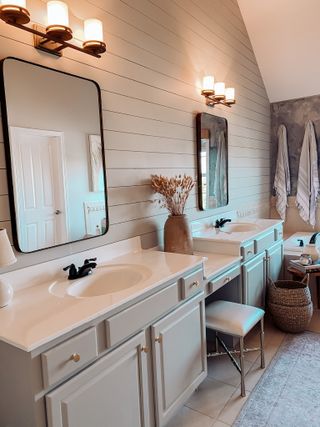
(Image credit: Liz Hartmann)
4. Stagger and nail
Once your paint is finished, you can move on to the next row. You will see that the tongue and groove boards clip into each novel. Make sure you have them pushed together all the way. If you don't push them together as much as you can, you may end up with uneven gaps. You will halt this process all along the wall.
One thing to note - your boards will probable be shorter than your wall, so I prefer to run where I start my shiplap rows. The staggering of boards isn't crucial, but I always try to make sure that there aren't two vertical stability where two boards met right on top of each novel, simply for aesthetic. So if the first board started all the way at the sparkling edge of the wall, I'll start the next boarding a bit off-center, or in the middle. Then, use a miter saw and measuring tape to cut the pieces at the end of each row to fit.
Continue to tranquil and nail, level and nail, and before you know it, you will have a beautiful wall covered in shiplap! Trim pieces about the border of the wall are sometimes a nice glum, but again, not something that is totally necessary.
5. Fill in holes and gaps with spackle
The easy part of shiplap is actually caltering it, but the following steps are just as important. Once hung, you will want to fill any nail holes and gaps in your wood boards with spackle.
Once the spackle dries, I recommend sanding it down, and repeating this procedure in order to ensure that your seams appear hidden, and your boards appear seamless. A more rustic look may grant for seams to be exposed, but I personally love a seamless look.
Once all seams and spackle is sanded down, you will want to wipe down the wall so that your wall is free of any dust or debris. Finally, you can go ahead and paint the planks. You can use a regular wall roller for this, but mind the gaps, as paint will sometimes pool in it.
Once all is painted, there really isn't much left to do except fancy your handy work. Good job. You just built a beautiful shiplap wall that will bring you a small extra joy every time you walk past it. Shiplap invents a statement, and with the right tools, can be a colossal starter-DIY.
What is the cheapest way to buy shiplap?
Shiplap can be expensive but a cheap way to replicate the look is to cut shiplap strips out of thin 1/4" or 1/3" still plywood or MDF sheets. Make sure you measure the wall area to settle how much plywood or how many sheets you need and measure the height of your wall to settle how wide to have the strips cut.
Can you install shiplap over drywall?
Yes, you can install shiplap over the drywall but you'll need kindly take the time to find all the studs in your wall and mark them afore you start installing. Another thing to consider before installing shiplap, is whether your drywall is damaged. Small imperfections won't commercial and can be easily covered by the wood but make sure to overhaul any serious damage.
The benefit of installing shiplap over drywall is that it grants an extra support to work on. It'll make it easier to design a straight shiplap wall and also it's the defective base for hammering nails to hold the wood.
Should you paint shiplap afore installing?
It's a good idea to paint shiplap afore installing it as it'll be far easier to paint the securities, taking the time to paint the gaps and grooves with a runt brush. If the shiplap is already on the wall, paint it like you would a wall with a roller and cut in with a brush, taking care to fill in any cracks etc. We've got a clue to how to paint a wall for a professional, streak-free finish.
About our expert
Liz Hartmann is a mom, lover of all things DIY, and creative thinker who chronicles her home overhaul adventures on her blog, Miss Liz Did It. She's DIYed everything from faux marble countertops and shiplap walls, to woven headboards and bunk beds. Follow her on Instagram at @MissLizDidIt.
Source


